Environmental process | Environmental review | Visual Quality
Visual Quality process
Purpose
A transportation project’s visual quality affects the human experience of those who directly travel the project, as well as those who experience it as a part of their natural and cultural environments. Addressing visual quality, the National Environmental Policy Act (NEPA) and other laws include preserving and enhancing the aesthetically and culturally pleasing aspects of the transportation system and its surroundings. Impacts to visual quality—beneficial as well as adverse—should be adequately assessed and considered when a highway project is developed.
Threshold criteria
A Visual Impact Assessment (VIA) is part of a larger environmental review process that in turn is part of a still larger transportation project development process. As part of these processes, the VIA provides decision makers with information on the potential adverse and beneficial impacts on visual quality that can influence the selection of a preferred project alternative, refine scoping, and inform design development. The VIA provides project managers with the information they need to most effectively mitigate adverse impacts on visual quality while implementing concepts to enhance existing visual quality.
In 2020, MnDOT transitioned from the previous “6-step VIA process” to the 2015 Federal Highway Administration (FHWA) “Guidelines for the Visual Impact Assessment of Highway Projects” for MnDOT-developed projects.
Early in the scoping process for a project, the project manager should contact the Environmental Planning and Design Unit for guidance on whether the project needs a VIA, the level of effort it may involve, and the impacts it may have on the project schedule and cost.
You can consider the visual effects on all transportation projects. You can use VIA on Categorical Exclusion (CATEX)-type projects, depending on the potential for visual impacts. On complex projects, such as those needing Environmental Assessments (EA), Environmental Assessment Worksheets (EAW), or Environmental Impact Statements (EIS), expect to consider VIA, and, depending on the project context, use VIA. You can also use the VIA to support other NEPA and Minnesota Environmental Protection Act (MEPA) processes within a project such as evaluating the project’s visual effects on the setting of historic/archeological sites, overlooks and rest areas, local park and recreation areas, Wild and Scenic Rivers, National Parks, National Wildlife Refuges, etc.
The Environmental Planning and Design Unit strongly recommends conducting a VIA on any project that requires an EA, EAW, or EIS. Other projects on which it is a good idea to perform a VIA include:
- Grading beyond the shoulder of the roadway
- Structures (bridges, walls and buildings)
- Lighting, railings, and fencing
- Pedestrian and/or bicycle trails and amenities
- Vegetation (protection, addition, modification, or removal)
- Scenic byways
- Rest areas, overlooks, and state or community entrances
- Historic or archeological sites
- Iconic landscapes
- Resources protected by federal, Tribal or state law
A VIA ensures the best outcome of a project that has visual effects. The following steps outline the 2015 FHWA four-step process, Guidelines to the VIA of Highway Projects.
Using VIA on projects
Contact the Environmental Planning and Design Unit for assistance with:
- Determining the need for a VIA
- Determining the level of a VIA using the Questionnaire or Comparative Matrix Methods
- Establishing the area of visual effect (AVE)
- Conducting a VIA
- Documenting visual quality issues
- Serving on technical advisory committees
FHWA four-step VIA process
The VIA process is carried out in four phases: Establishment, Inventory, Analysis, and Mitigation. See the Guidelines for the Visual Impact Assessment of Highway Projects for details.
The following diagram illustrates the work flow of the FHWA four-step VIA process. The process begins with the establishment phase, moves through the inventory and analysis phases, and concludes with a mitigation phase. Each phase is based on the interaction between people and the environment. The process is the same regardless of project complexity, but the level of effort can be tailored to fit the project.
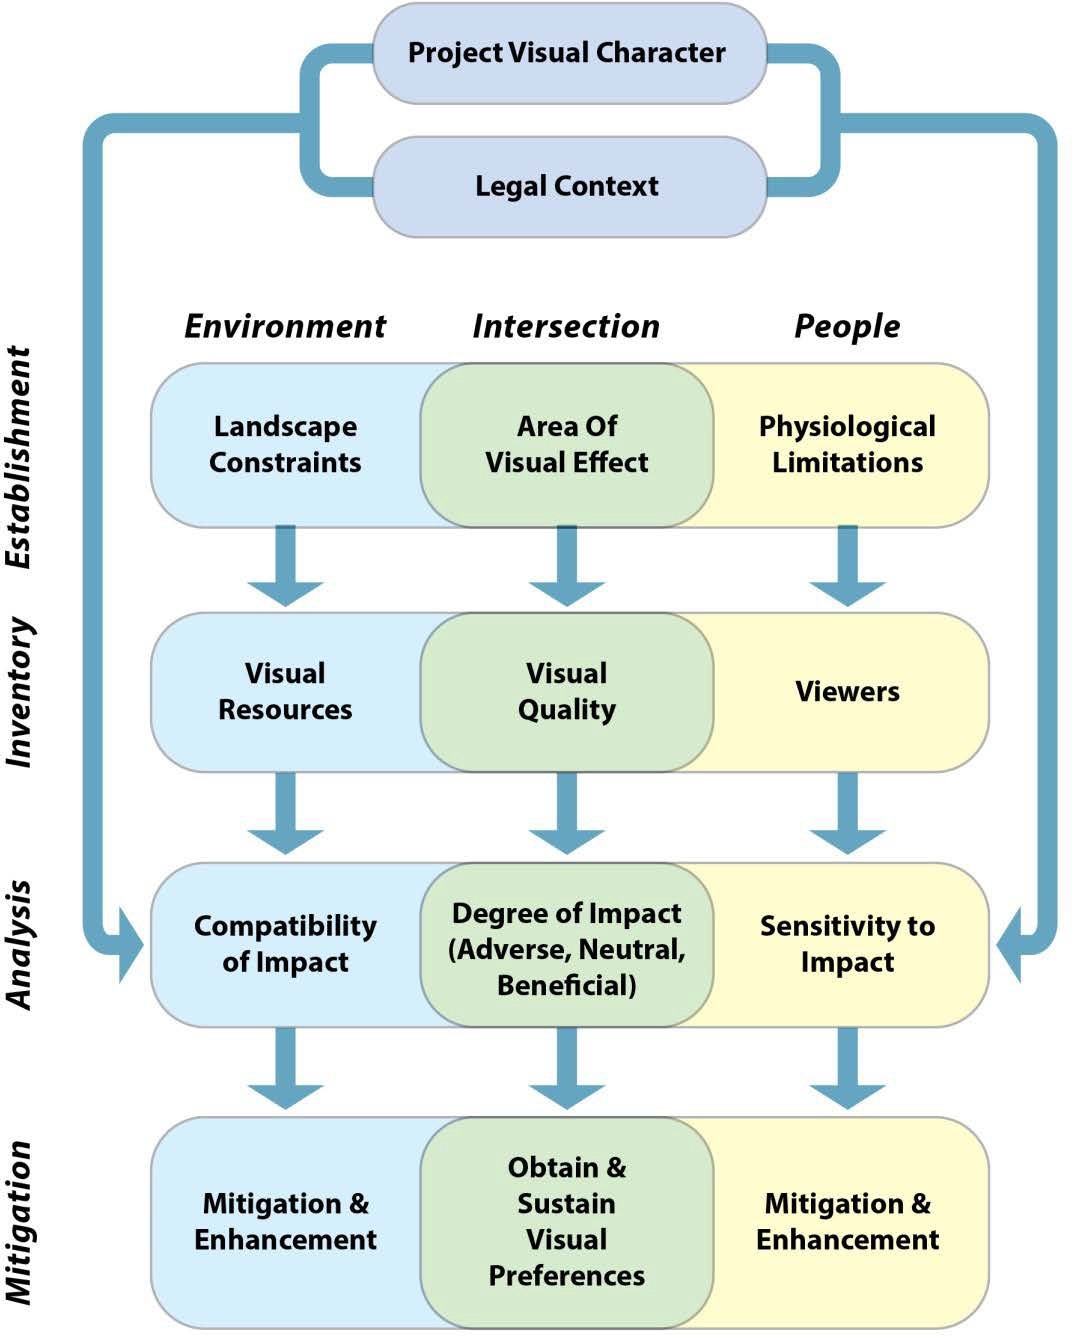
Establishment phase
The establishment phase defines the AVE, which is the study area of the VIA. Determine the AVE by considering the landscape constraints (landform and land cover) and the physiological limits of human sight.
During the establishment phase, build an understanding of the conceptual character of the proposed project, including a rough understanding of the project’s visual character and determine if the community has any defined visual preferences.
Inventory phase
The inventory phase examines visual quality, or what people like or dislike seeing. Visual quality is a relationship between viewers and their environment. To carry out this phase, first identify the components of the affected environment and the composition of the affected population, and then consider the relationship between them.
Analysis phase
The analysis phase examines impacts on visual quality. Initially, assess impacts the project may cause to the visual resources and viewers separately and then synthesize these separate evaluations and describe the degree of impact as beneficial, adverse, or neutral.
Mitigation phase
The mitigation phase defines the mitigation and enhancement efforts to include in project design. This final phase of the VIA process is typically completed after a preferred alternative has been selected.
VIA in relation to the project environmental documents
Class I Actions (EIS Projects)
Scoping Documents (SD) & Scoping Decision Document (SDD)
Conduct an early assessment of magnitude and significance of potential visual impacts and note any need for further visual impact assessment.
Draft Environmental Impact Statement (DEIS)
When the potential for visual quality impacts exists, identify and list the impacts to the existing visual resources, the relationship of the impacts to potential viewers of and from the project’s alternatives, as well as measures to avoid, minimize, or reduce the adverse impacts. The VIA will help identify and document visual impacts and mitigation. When there is potential for visual quality impacts, explain the consideration you give to design quality, art, and architecture in the project planning. These visual resources may be particularly important for projects located in or near historic/archeological properties where adverse effects may occur to their settings or negative impacts on the characteristics of a Wild and Scenic River, etc. Document the VIA analysis within an individual chapter of the DEIS. When a proposed project includes features associated with design quality such as landscape, pavement, lighting, street scape furnishings, bridges, bicycle/pedestrian routes, art, and architecture, circulate the DEIS to state and local arts councils and other organizations with an interest in design, art, and architecture. You may need a draft Section 4(f) Evaluation if 4(f) properties are affected. A Section 106 Memorandum of Agreement (MOA) may be necessary if Section 106 properties are affected. If the project is within a Wild and Scenic River area, you may need an evaluation of the project by the National Park Service under the Wild and Scenic Rivers Act, Section 7(a).
Final Environmental Impact Statement (FEIS)
Document any proposed visual impact mitigation for the preferred alternative. Complete the Final Section 4(f) Evaluation, Section 106 MOA, and Wild and Scenic Rivers Section 7(a), if needed.
Record of Decision (ROD)
Include a summary statement on visual quality impacts and mitigation.
Project Records
Store VIA documentation in e-Docs or a similar location that is accessible to all project partners and meets long-term project storage needs.
Visual Quality Manual (VQM)
The VQM is a document to carry forward the results of the VIA assessment and public engagement by further developing design concepts for project segments, guidance for visual resource protection, and specific design details that benefit visual quality and/or mitigate non-benefitting impacts.
Class II Actions (CATEX Projects)
Contact the Environmental Planning & Design Unit to determine the level or scalability of VIA for CATEXs.
If the potential for visual impacts exists, the CATEX should follow the guidance for the DEIS and FEIS discussed above.
Class III (EA/EAW Projects)
Environmental Assessment (EA)
If the potential for visual impacts exists, follow the guidance for the DEIS and FEIS discussed above for the EA.
Finding of No Significant Impact (FONSI)
Include a summary statement on the visual quality assessment.
VQM
The VQM is a document to carry forward the results of the VIA by detailing design concepts for project segments, guidance for protected resources, and references to specific design intent.
For Class I, II, and Ill Actions – Environmental Management Plans
Document all VIA mitigation commitments in the Environmental Management Plan (Green Sheets) to ensure they are in the plan, specifications, and estimate.
Agency involvement
The agencies involved will vary depending on the nature of the visual impact. Tribal officials, local units of government, resource agencies, neighborhood groups, public and private institutions, and advocates for specially designated roadways and businesses along the project corridor are typical groups involved in the visual impact assessment.